> ## Documentation Index
> Fetch the complete documentation index at: https://docs.withbenji.com/llms.txt
> Use this file to discover all available pages before exploring further.
# Campaign Settings Page
> Control all of your campaign settings
The Campaign Builder walks you through 4 steps to configure a campaign: Details, Schedule, Flows, and Goals. Navigate between steps using the step indicator at the top of the modal. Campaigns are saved as drafts until you complete all steps and click Save Campaign.
## Step 1: Details
Set up your campaign name, type, description, and icon.
In this section you can view or configure the following parameters:
| Parameter | Description | Possible values |
| ----------------------------------------------------------------------------------------------------------------------- | --------------------------------------------------------------------------------------------------------------------------------------------------------------------------- | ------------------------------------------------------ |
| | The unique system-generated identifier for this campaign. This identifier will be used by the integrating partner when calling the Benji API to interact with the campaign. | A system-generated number. This value is **Read Only** |
| | A descriptive name for the campaign. This name will be displayed by default on all relevant Benji Drop-In Components related to this campaign | |
| | A description for this campaign. | |
| | An image to associate with this specific campaign | A JPG, JPEG, PNG or SVG image |
### Campaign Type
In this section you can configure the distinct campaign type for this campaign.
 The Benji Platform supports 4 different campaign types:
* **Earn Points**: A campaign that, once triggered and if the configured conditions are met, distributes points to the connected user based on the base points distribution amount and any multipliers associated with the specific connected user.
* **Redeem**: A campaign that, once triggered and if the configured conditions are met, allows the connected member to redeem points to use to purchase items (or partial items) on the partner's online store.
* **Transfer**: A campaign that allows connected members to transfer points between their loyalty program account and a partner's program. Operators configure a transfer conversion rate and transfer increments so members transfer in set multiples (for example, 1,000 points at a time).
* **Connect Only**: A status sharing only campaign, meant to connect member data between your and your partner's accounts. In this campaign type there is no movement of points to or from members.
## Step 2: Schedule
Set when the campaign goes live.
| Parameter | Description | Possible values |
| :------------------ | :------------------------------------------------------- | :--------------------------------------- |
| **Start Date** date | The date the campaign activates. | A valid future date |
| **End Date** date | The date the campaign automatically ends. Not mandatory. | A valid future date after the start date |
Note that an end date is not mandatory. Campaigns without an end date will be evergreen until paused.
## Step 3: Flows
Set who earns, how they earn, and what they earn for your campaign.
A campaign can have multiple flows. Each flow defines a separate trigger and its associated configuration. Use the left sidebar to add and switch between flows. Each flow consists of the following configurable sections:
### Campaign Trigger
The trigger is the user action that qualifies a member for the campaign. Once a trigger fires, the Benji Platform triggers a rule engine to validate the conditions associated with the flow, and distributes rewards if all conditions are met.
The Benji Platform supports 4 different campaign types:
* **Earn Points**: A campaign that, once triggered and if the configured conditions are met, distributes points to the connected user based on the base points distribution amount and any multipliers associated with the specific connected user.
* **Redeem**: A campaign that, once triggered and if the configured conditions are met, allows the connected member to redeem points to use to purchase items (or partial items) on the partner's online store.
* **Transfer**: A campaign that allows connected members to transfer points between their loyalty program account and a partner's program. Operators configure a transfer conversion rate and transfer increments so members transfer in set multiples (for example, 1,000 points at a time).
* **Connect Only**: A status sharing only campaign, meant to connect member data between your and your partner's accounts. In this campaign type there is no movement of points to or from members.
## Step 2: Schedule
Set when the campaign goes live.
| Parameter | Description | Possible values |
| :------------------ | :------------------------------------------------------- | :--------------------------------------- |
| **Start Date** date | The date the campaign activates. | A valid future date |
| **End Date** date | The date the campaign automatically ends. Not mandatory. | A valid future date after the start date |
Note that an end date is not mandatory. Campaigns without an end date will be evergreen until paused.
## Step 3: Flows
Set who earns, how they earn, and what they earn for your campaign.
A campaign can have multiple flows. Each flow defines a separate trigger and its associated configuration. Use the left sidebar to add and switch between flows. Each flow consists of the following configurable sections:
### Campaign Trigger
The trigger is the user action that qualifies a member for the campaign. Once a trigger fires, the Benji Platform triggers a rule engine to validate the conditions associated with the flow, and distributes rewards if all conditions are met.
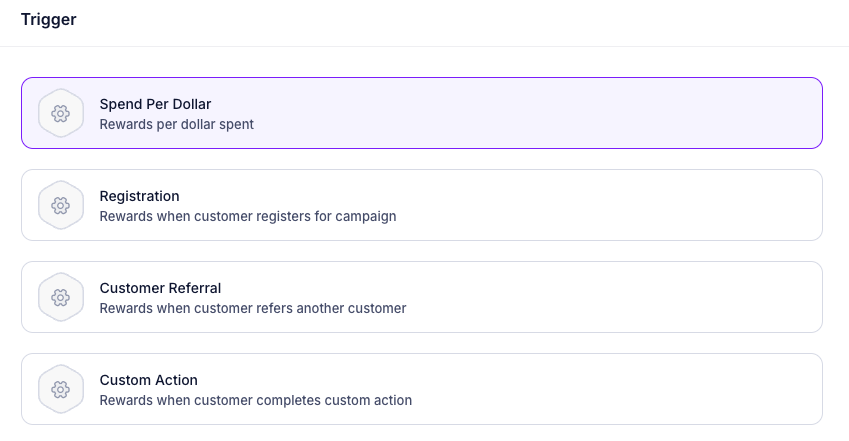 The following trigger types are supported:
* **Spend Per Dollar**: Triggered on a transaction event on the partner's store.
* **Registration**: Triggered when a member registers on the partner store and connects their account through the Benji platform to your loyalty program.
* **Customer Referral**: Triggered when a connected member makes a successful referral on the partner store.
* **Custom Action**: A custom action that can be triggered from anywhere on the partner's store. This is meant for use cases that are not yet natively supported by the platform and provides flexibility to create any type of campaign using Benji's APIs.
Triggers are especially useful when used in conjunction with Benji Drop-In components. The drop-in components can automatically render on the partner's online store based on these triggers and their respective placement.
* **Points per dollar spent**: This numeric value represents the base value of a transaction with your points. For Earn type campaigns, this represents the base value of how many reward points the connected member will be earning for every dollar spent. For Redeem type campaigns, this value represents the base amount of dollars each reward point is worth on the partner's store. This value will not be displayed for Connect Only type campaigns.
### Campaign Actions
In this section you can configure the base actions that will occur when a trigger happens and the relevant conditions are met.
The following trigger types are supported:
* **Spend Per Dollar**: Triggered on a transaction event on the partner's store.
* **Registration**: Triggered when a member registers on the partner store and connects their account through the Benji platform to your loyalty program.
* **Customer Referral**: Triggered when a connected member makes a successful referral on the partner store.
* **Custom Action**: A custom action that can be triggered from anywhere on the partner's store. This is meant for use cases that are not yet natively supported by the platform and provides flexibility to create any type of campaign using Benji's APIs.
Triggers are especially useful when used in conjunction with Benji Drop-In components. The drop-in components can automatically render on the partner's online store based on these triggers and their respective placement.
* **Points per dollar spent**: This numeric value represents the base value of a transaction with your points. For Earn type campaigns, this represents the base value of how many reward points the connected member will be earning for every dollar spent. For Redeem type campaigns, this value represents the base amount of dollars each reward point is worth on the partner's store. This value will not be displayed for Connect Only type campaigns.
### Campaign Actions
In this section you can configure the base actions that will occur when a trigger happens and the relevant conditions are met.
 You can configure multiple actions per campaign.
A common example of a campaign with multiple actions is receiving rewards from both partners. For instance, earn 2 reward points from Partner A and 3 reward points from Partner B for every transaction.
For each action, you can specify the action itself, which partner controls the action (if applicable), and the **base** conversion rate of the action:
When configuring an action, you will only be able to set your own organization as the owner of the action. If there is another partner, they will be able to do the same. The actions owned by the other partner will be visible in read-only mode on your account.
**Action**
Possible values of actions to perform:
* **Award Points/Redeem Points**: Depending on whether the campaign is an Earn or Redeem type campaign
* **Award Cashback**: If applicable and configured in your settings, enables earning cashback for a trigger on the user's account.
**Partner**
The partner owning this action. This will be automatically filled in based on who is editing/creating the campaign.
**Conversion Rate**
The base value of conversion of the action:
* **Reward Distribution Value**: A number representing the value of the conversion (e.g. **3 reward points per dollar spent**)
The conversion rate configured in this section is the **base** conversion rate. Any configured multipliers will take effect based on the conversion rates defined in this section.
### Campaign Conditions
In this section you can configure the conditions associated with a valid campaign trigger. When a trigger is met, the Benji Platform will validate the conditions configured on the campaign, and will approve and initiate the campaign transaction only if the conditions are met.
You can configure multiple actions per campaign.
A common example of a campaign with multiple actions is receiving rewards from both partners. For instance, earn 2 reward points from Partner A and 3 reward points from Partner B for every transaction.
For each action, you can specify the action itself, which partner controls the action (if applicable), and the **base** conversion rate of the action:
When configuring an action, you will only be able to set your own organization as the owner of the action. If there is another partner, they will be able to do the same. The actions owned by the other partner will be visible in read-only mode on your account.
**Action**
Possible values of actions to perform:
* **Award Points/Redeem Points**: Depending on whether the campaign is an Earn or Redeem type campaign
* **Award Cashback**: If applicable and configured in your settings, enables earning cashback for a trigger on the user's account.
**Partner**
The partner owning this action. This will be automatically filled in based on who is editing/creating the campaign.
**Conversion Rate**
The base value of conversion of the action:
* **Reward Distribution Value**: A number representing the value of the conversion (e.g. **3 reward points per dollar spent**)
The conversion rate configured in this section is the **base** conversion rate. Any configured multipliers will take effect based on the conversion rates defined in this section.
### Campaign Conditions
In this section you can configure the conditions associated with a valid campaign trigger. When a trigger is met, the Benji Platform will validate the conditions configured on the campaign, and will approve and initiate the campaign transaction only if the conditions are met.
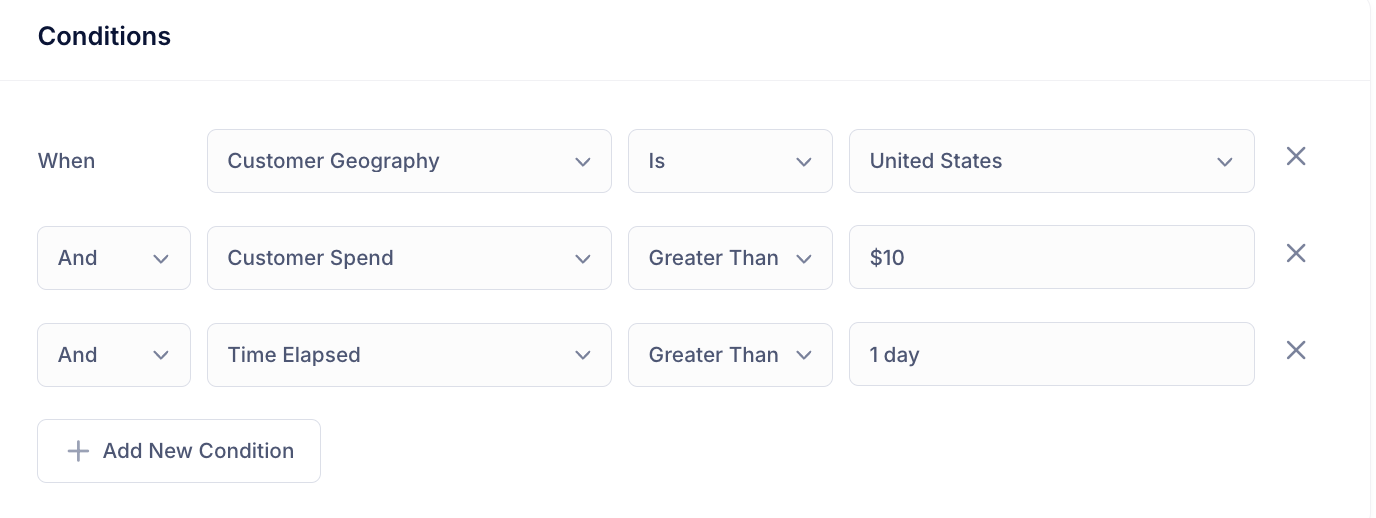 You can configure a limitless number of conditions per campaign, and configure whether the association between each condition is an OR, meaning just one of the conditions needs to be met, or as an AND, meaning all of the conditions need to be met to satisfy the condition. For each condition, you can specify the attribute the condition is applied to, an operator, and a value that meets the conditions. The following attributes and their respective operators and values are supported:
**Customer Geography**
Will only be valid if the user meets the geographical condition.
* **Operators**: **Is In** or **Is Not In**
* **Values**: Countries, US cities
**Customer Total Spend**
Will only be valid if the user has exceeded a total spend amount since they connected their account. For instance, if the campaign distributes a certain amount of reward points after the member has purchased over \$1000 in goods.
* **Operators**: **Greater Than**
* **Values**: Numeric amount
**Transaction Basket Size**
Will only be valid if a member is making a purchase over or under a certain amount.
* **Operators**: **Greater Than**, **Less Than**
* **Values**: Numeric amount
**Time Elapsed**
Will only be valid if a defined amount of time has passed since they connected their accounts.
* **Operators**: **Greater Than**, **Less Than**
* **Values**: A time period (e.g. 1 day, 2 weeks, 3 months, etc.)
### Campaign Multipliers
In this section you can configure certain conditions under which a certain member would get a multiplier boost on their earned or redeemed rewards for a specific transaction.
For **Earn** type campaigns, this means the member, if the condition is met, will earn a multiplier on the base Points earned per dollar variable configured in the triggers section.
For **Redeem** type campaigns, this means the member will get a multiplier on the conversion rate per dollar defined in the triggers section above.
You can configure a limitless number of conditions per campaign, and configure whether the association between each condition is an OR, meaning just one of the conditions needs to be met, or as an AND, meaning all of the conditions need to be met to satisfy the condition. For each condition, you can specify the attribute the condition is applied to, an operator, and a value that meets the conditions. The following attributes and their respective operators and values are supported:
**Customer Geography**
Will only be valid if the user meets the geographical condition.
* **Operators**: **Is In** or **Is Not In**
* **Values**: Countries, US cities
**Customer Total Spend**
Will only be valid if the user has exceeded a total spend amount since they connected their account. For instance, if the campaign distributes a certain amount of reward points after the member has purchased over \$1000 in goods.
* **Operators**: **Greater Than**
* **Values**: Numeric amount
**Transaction Basket Size**
Will only be valid if a member is making a purchase over or under a certain amount.
* **Operators**: **Greater Than**, **Less Than**
* **Values**: Numeric amount
**Time Elapsed**
Will only be valid if a defined amount of time has passed since they connected their accounts.
* **Operators**: **Greater Than**, **Less Than**
* **Values**: A time period (e.g. 1 day, 2 weeks, 3 months, etc.)
### Campaign Multipliers
In this section you can configure certain conditions under which a certain member would get a multiplier boost on their earned or redeemed rewards for a specific transaction.
For **Earn** type campaigns, this means the member, if the condition is met, will earn a multiplier on the base Points earned per dollar variable configured in the triggers section.
For **Redeem** type campaigns, this means the member will get a multiplier on the conversion rate per dollar defined in the triggers section above.
 You can configure a limitless number of multipliers per campaign. For each multiplier, you can specify the multiplier amount, a customer attribute to validate (the condition) and the corresponding value of the customer attribute to validate. The following customer attributes are supported:
**Customer Status**
Will only be valid if the user is of a certain status.
* **Operators**: **Is In** or **Is Not In**
* **Values**: Any one of your loyalty programs' status tiers configured in the Benji Platform.
**Variable Attributes**
You can create multipliers based on any attribute returned as part of the Benji Platform integration with your platform. A typical example would be Card Member status, # of total rewards earned throughout their membership, etc.
* **Operators**: **Is In** or **Is Not In**
* **Values**: Configurable values based on the variable attribute possible values configured in the settings section of the Benji Platform.
### Campaign Limits
In this section you can configure limits to control how frequently members can qualify for rewards and the maximum value they can earn or redeem.
You can configure a limitless number of multipliers per campaign. For each multiplier, you can specify the multiplier amount, a customer attribute to validate (the condition) and the corresponding value of the customer attribute to validate. The following customer attributes are supported:
**Customer Status**
Will only be valid if the user is of a certain status.
* **Operators**: **Is In** or **Is Not In**
* **Values**: Any one of your loyalty programs' status tiers configured in the Benji Platform.
**Variable Attributes**
You can create multipliers based on any attribute returned as part of the Benji Platform integration with your platform. A typical example would be Card Member status, # of total rewards earned throughout their membership, etc.
* **Operators**: **Is In** or **Is Not In**
* **Values**: Configurable values based on the variable attribute possible values configured in the settings section of the Benji Platform.
### Campaign Limits
In this section you can configure limits to control how frequently members can qualify for rewards and the maximum value they can earn or redeem.
 Limits set boundaries on transaction values, member qualification frequency, and total rewards. You can set transaction minimums to ensure meaningful engagement, cap total rewards per user, or limit qualification frequency to control the pacing of your campaigns.
You can configure multiple limits per campaign. The following limit types are supported:
**Transaction Limits**
Controls the minimum or maximum value allowed per individual transaction.
* **Operators**: Minimum, Maximum
* **Values**: Numeric amount (points or dollars depending on campaign type)
**User Limits**
Controls the maximum number of qualifying events or total points a user can accumulate within a specified time period.
* **Operators**: Maximum
* **Units**: Qualifying events or Points
* **Values**: Numeric amount
* **Time Period:** Per day, per week, per month, per quarter, per year, or lifetime
## Step 4: Goals
Set primary goals for your campaign. Benji will track progress against these goals, which you can view in the Analytics page when filtering by campaign.
Limits set boundaries on transaction values, member qualification frequency, and total rewards. You can set transaction minimums to ensure meaningful engagement, cap total rewards per user, or limit qualification frequency to control the pacing of your campaigns.
You can configure multiple limits per campaign. The following limit types are supported:
**Transaction Limits**
Controls the minimum or maximum value allowed per individual transaction.
* **Operators**: Minimum, Maximum
* **Values**: Numeric amount (points or dollars depending on campaign type)
**User Limits**
Controls the maximum number of qualifying events or total points a user can accumulate within a specified time period.
* **Operators**: Maximum
* **Units**: Qualifying events or Points
* **Values**: Numeric amount
* **Time Period:** Per day, per week, per month, per quarter, per year, or lifetime
## Step 4: Goals
Set primary goals for your campaign. Benji will track progress against these goals, which you can view in the Analytics page when filtering by campaign.
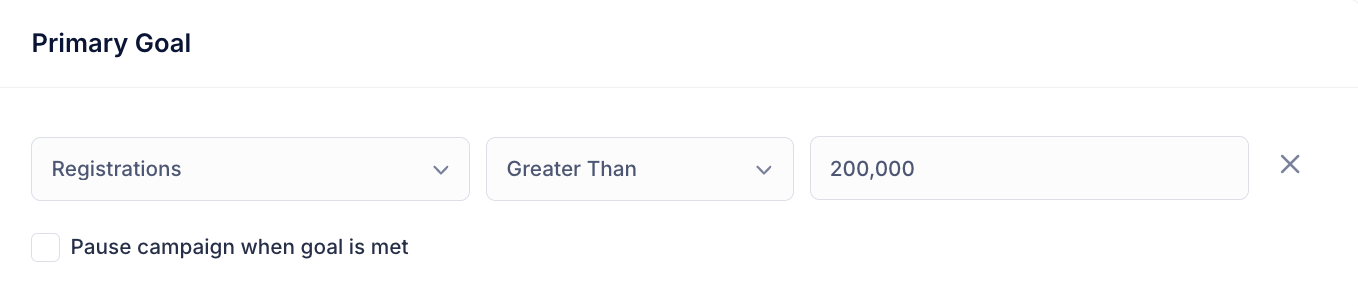 The Benji platform supports setting the following built-in goals:
**Registrations**
Specifies a goal of reaching or exceeding a certain number of new registrations as a result of the partnership
**Points Earned**
Specifies a number representing the total amount of reward points earned throughout the campaign
**Points Redeemed**
Specifies a number representing the total amount of reward points redeemed throughout the campaign
The Benji platform supports setting the following built-in goals:
**Registrations**
Specifies a goal of reaching or exceeding a certain number of new registrations as a result of the partnership
**Points Earned**
Specifies a number representing the total amount of reward points earned throughout the campaign
**Points Redeemed**
Specifies a number representing the total amount of reward points redeemed throughout the campaign